Light in photography
When it comes to photography, the type of lighting that you use is one of the most important elements of any photo. Light in photography refers to how the light source, which can be natural or artificial, is positioned in relation to your subject. The position and quality of light can affect any number of things in your final photo, from clarity to tone to emotion and so much more.
Task 1 AC 1.1
Task 2 AC 1.1, 2.1, 3.1
Artificial light is man-made, continuous, or flash. It is affected by the type, size, and placement of the lamps that are being used.
Studio Equipment used during photography classes:
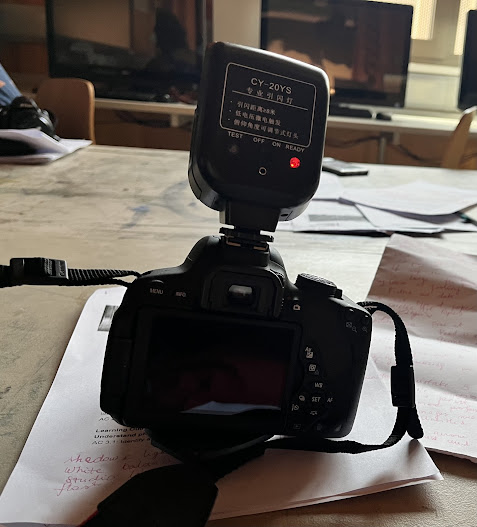
Infra red flash trigger (attached to the Cannon camera)
Seconic light meter - gives correct exposure reading.
What is Exposure?
The intensity of light is controlled by camera exposure.
Exposure in photography means adjusting your camera to meet the amount of light available. Correct exposure is determined by a photographer according to their main subject.
- Overexposure means that the image sensor has been exposed to too much light, resulting in a photograph that is too bright.
- Underexposure means that the image sensor has been exposed to too little light, resulting in a photograph that is too dark.
- Correct exposure means that the main subject is correctly lit. This might still mean that some areas are over- or underexposed.
 Underexposure
 Correct exposure
Tip: Camera settings which are correct for taking a portrait of a person with a fair skin colour might be incorrect when taking a photo of a person with a darker skin tone.
Above pictures were taken using only soft boxes.
Metering with Seconic light meter
A light meter will give you the correct exposure.
Only the Aperture will affect the exposure.
Maximum shutter speed for camera 1/250.
Shoot using the Manual Settings of a camera.
ISO100 1/125 f11
Flash meter gives you a benchmark idea of correct exposure. A photographer decides if prefers a darker or a lighter image.
ISO 100 1/125 f22
ISO 100 1/125 f4.0
ISO 100 1/125 f 16
In this scenario light meter readings were f11. When we decreased the aperture to f22 the image was underexposed. When we increased the aperture to f4.0 the photo was overexposed.
Everyone has agreed that prefer the last photo(f16) because of the more intensive colours.
Task 3 Using different lighting techniques
Whether you’re doing portrait photography or still life or landscape, so much of your lighting choices will depend on the features of your subject, and how you want them to be portrayed in your photos.
During the photography classes, we have been studying these lighting techniques:
- Available light
- Continuous strobe light (light stays on) with soft box/soft lighting
- Continuous strobe light - no soft box - harsh light
- Use of 1 light
- Use of 2 lights
- Flash lighting
Harsh light is more severe and will emphasize angles and any surface that isn’t perfectly flat, like the waves at a beach or a model with wrinkles or acne, while soft light will smooth over these features. If you’re doing a beauty shoot where the focus is flawless features, the type of lighting that you use will likely be very different than a photoshoot where you want to emphasize the personality and distinctive lines of your model’s face.
Available light portraiture
Available, ambient, or existing light refers to any light that is not supplied by the photographer. It can be a mix of natural and artificial light.
Natural light is from the sun. It is affected by weather conditions and the time of the day and year.
Tips for shooting in natural light:
- Distance from the subject: When the light to a subject is doubled, light intensity decreases to a quarter.
Example:
- Shutter speed is the most important. 1/60 is perfect otherwise the image can come out shaky if no tripod is used.
- ISO 400-800 makes the image sharper. If higher ISO you will create a darker picture and add drama.
Example:
- Aperture: F4.00 - f 5.00 will create a blurred background.
Example:

- To achieve better portraits and professional looks use a backdrop fabric and reflector diffusers.


No reflector has been used.
White reflector has been used.
Gold reflector has been used.
Photographs of a classmate Denis were taken with use of flash lighting and a trigger.
Studio Flash lighting allows the creative use of light;
Independent of available light;
Thanks to High Light output
- allows low ISO to be used: ISO 100
_ allows a fast shutter speed to be used: 1/25
_ allows the optimum lens aperture to be used: f11.
Correct exposure
Task 3 AC 3.2 Assess lighting for photography
When you’re deciding what type of light works for a project, it’s going to come down to a subject and the concept and mood you are attempting to execute.
The types of lighting I like the most are: soft light in the studio and available light on sunny days.
The use of one soft box and black background makes the picture more artistic and dramatic while enhancing the colour of the fabric used. Also adds beauty to a model's skin.
Natural light on sunny days captures the vibrancy of colours without a need for Photoshop.
Health and safety hazards at studio:
- Loose wires and safety hazards -use duct tape to avoid tripping hazard;
-No food and drink around expensive electrical equipment;
-Check light stands and tripods and make sure these are tightened;
-Do not touch the bulbs. Finger marks and smudges left on the bulb can cause localised hot spots, which can lead to bulbs blowing;
-Suspended equipment secure with secondary chains;
-Keep studio tidy and free from clutter. This is the easiest way to prevent accidents.


.jpg)


Comments
Post a Comment